Minimum Viable GraphQL QuickStart
January 1, 2018
Minimum Viable GraphQL QuickStart
We'll use React, GraphQL and Apollo to make a simple counter. We'll also use Graph.Cool as our hosted GraphQL backend. GraphCool is a GraphQL backend as a service, analogous to Firebase.
Why These Technologies?
GraphQL. GraphQL enables you to fetch exactly the data that you need from your database, no more or less. GraphQL let's you bundle nested requests into a single request. Instead of requesting users/{userId} and then posts/{postId} you request { users: { posts } } at once.
Apollo. Apollo is the easiest way to get started with GraphQL. The alternative to Apollo is Relay. In this example, we'll be using apollo-react to build a simple React component that fetches and pushes data to our GraphQL database.
GraphCool. GraphCool is analogous to Firebase. If you want to host your own GraphQL server that's fine - but GraphCool is great for prototyping. Unlike Firebase, there's no vendor lock-in with GraphCool. You can swap in an in-house solution later.
The Overall Strategy
If you're familiar with Redux and its syntax connect(mapStateToProps, mapDispatchToProps)(App), client-side graphQL won't be difficult for you to learn.
Apollo has its own internal redux store. Apollo makes requests to your GraphQL server and intelligently updates it's internal store. Wrapping your React components with Apollo gives you access to Apollo's internal store.
GraphQL / Apollo Quick Start With Sample Project
This graphql-react-apollo is a minimum viable example of how you'd use Apollo and GraphQL, client-side. In this example we make a counter that keeps track of button clicks.
Clone this sample project and and install dependencies:
git clone https://github.com/focuswish/graphql-react-apollo.git
cd graphql-react-apollo
npm install
Create a GraphCool account (if you don't already have one). And be sure to install the GraphCool commandline interface.
npm install -g graphcool
graphcool auth # login
A new GraphCool project comes with User and File schema by default. We're going to initialize a new GraphCool project that adds a Counter schema:
From graphql-react-apollo issue the following;
graphcool init
https://raw.githubusercontent.com/focuswish/graphql-react-apollo/master/example.graphql
The URI after 'graphcool init' points to schema for a new type, Counter:
type Counter {
  count: Int!
}
If initializing the new GraphCool project is successful, you should see a Simple and Relay API URI printed in the console that looks something like:
Simple API:   https://api.graph.cool/simple/v1/cj5d82p4jmjg90127sqeiu4kg
Relay API:    https://api.graph.cool/relay/v1/cj5d82p4jmjg90127sqeiu4kg
You can also access your simple and relay API URIs from the GraphCool Console.
Copy + paste the Simple API URI into src/index.js as follows:
const networkInterface = createNetworkInterface({
  uri: 'https://api.graph.cool/simple/v1/cj5d82p4jmjg90127sqeiu4kg',
});
Start the server:
npm run devApollo / GraphQL Quick Start From Scratch
Let's start with a new project from scratch.
First we'll setup Apollo client.
mkdir my-app && cd my-app
npm i react-apollo react react-dom --save
// App.js
import React from 'react';
import ReactDOM from 'react-dom';
import {createNetworkInterface, ApolloClient, ApolloProvider} from 'react-apollo';
const networkInterface = createNetworkInterface({
uri: 'https://api.graph.cool/simple/v1/cj5d82p4jmjg90127sqeiu4kg',
});
const client = new ApolloClient({networkInterface})
// Wrap our root component (<App />) in <ApolloProvider></ApolloProvider>
ReactDOM.render(
<ApolloProvider client={client}>
<App />
</ApolloProvider>,
document.getElementById('root')
)Let's create a simple root component. We initialized the GraphCool project with sample schema for a counter. This sample schema only had one field, "count":
type Counter {
  count: Int!
}
Int is one of the primitative types. The exclaimation mark means that this field is non-nullable.
When you initialized this new GraphCool project, you provided a URL to the above schema. GraphCool automatically added some fields (ID, createdAt, and UpdatedAt).
type Counter implements Node {
  count: Int!
  createdAt: DateTime!
  id: ID! @isUnique
  updatedAt: DateTime!
}
Since we haven't populated our container with data yet, we'll make a button that creates a new counter.
const App = ({createCounter}) => (
  <div>
    <button onClick={() => ( createCounter({count: 0}) )}>Create counter</button>
  </div>
)
Just like with redux, we'll pass a createCounter() prop to our
The syntax looks like this:
import {graphql} from 'react-apollo';
const createCounter = gql`
  mutation createCounter(
    $count: Int!
  ) {
    createCounter(
      count: $count
    ) {
      count
      id
    }
  }
`
const AppWithData = graphql(createCounter, {
  props: ({ mutate }) => ({
    createCounter: ({count}) => mutate({variables: { count } }),
  }),
})(App)
Note that we've named our mutation 'createCounter.' This can be a useful heuristic, but naming mutations and queries isn't necessary. The state of affairs is analogous to javascript where you can write anonymous or named functions, e.g., () => {...} or function namedFunction() {...}.
Mutation Syntax
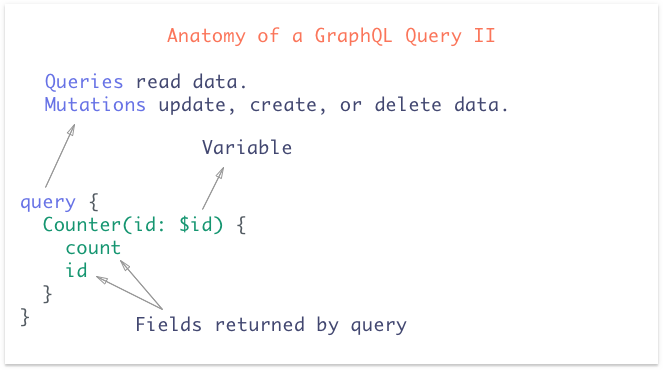
A mutation is anything that mutates a node, like creating, updating, or deleting nodes. We use queries to read data.
Mutation syntax looks like:
# name our mutation
mutation createCounter(
    # The count should be an integer (int)
    # The exclaimation-mark (!) means that $count is a required field
    $count: Int!
  ) {
    createCounter(
      # Pass $count as a variable
      count: $count
  ) {
    # The values we want this mutation to return
    # We could also return createdAt, updatedAt
    count
    id
  }
}
We could also add a default value to the count field with:
mutation createCounter($count: Int = 0) {...}This syntax is similar to ES6 parameter defaults, e.g., createCounter(count = 0)
Interfacing With React Components
Once again, we're using react-apollo to interface with GraphQL on the client-side.
import React from 'react';
import ReactDOM from 'react-dom';
import {createNetworkInterface, ApolloClient, ApolloProvider, graphql} from 'react-apollo';
const App = ({createCounter}) => (
  <div>
    <button onClick={() => ( createCounter({count: 0}) )}>Create counter</button>
  </div>
)
const createCounter = gql`
  mutation createCounter(
    $count: Int!
  ) {
    createCounter(
      count: $count
    ) {
      count
      id
    }
  }
`
const AppWithData = graphql(createCounter, {
  props: ({ mutate }) => ({
    createCounter: ({count}) => mutate({variables: { count }})
  })
})(App)
const networkInterface = createNetworkInterface({
  uri: 'https://api.graph.cool/simple/v1/cj5d82p4jmjg90127sqeiu4kg',
});
const client = new ApolloClient({networkInterface})
ReactDOM.render(
  <ApolloProvider client={client}>
    <AppWithData />
  </ApolloProvider>,
  document.getElementById('root')
)
GraphQL Queries
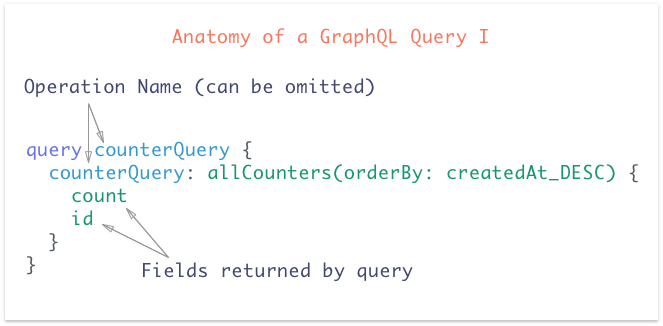
GraphQL really shines with queries. That's because GraphQL empowers us to ask for only the data that we need. Nested queries are a breeze so we don't need to make multiple roundtrips to the server to gain access to a deeply nested edge.


With GraphCool, you can query all nodes of a certain type with all{Nodes}. For example, if you want to query all of the records of type User, we invoke allUsers.
To query a specific node, you pass an ID as a variable.
Some GraphQl nomenclature:
- a node must return either a Scalar, Enum, Object, Interface, Union or a Non-Null wrapper around one of these types. Nodes cannot return a list.
- an edge connects two nodes together. Edges must contain a node field, and a cursor field (for pagination). This cursor field returns a type that serializes as a String; this may be a String, a non-null wrapper around a String, a custom scalar that serializes as a String, or a non-null wrapper around a custom scalar that serializes as a String.