Easy: Add Firebase Facebook Login To Your React App
May 1, 2018
Authentication and authorization is an intimidating part of web app development. I prefer front-end development. Firebase takes care of the backend for you so that you can focus on the core business and value proposition instead of reinventing the wheel.
It turns out that it's super easy to add Facebook login functionality to your React app. If I can do it in 15 minutes, I guarantee it won't be hard for you at all (especially if you're a js pro).
In part I we'll walk through the following:
- Getting your Firebase API key
- Enabling Facebook login in the Firebase console
- Getting Your App ID and App Secret From Facebook and Pasting them into the Firebase console
- Adding your OAuth redirect URI from Firebase to your Facebook app
In part 2, we'll dive into the code:
- Installing Firebase and Reactfire via npm into a new React app
- Adding your Firebase API key to your React component
- Initializing Firebase in your React component
- Declaring Facebook as your login provider with
provider = new firebase.auth.FacebookAuthProvider() - Saving Facebook user data in state with
this.setState({user: user.result})
Part I: Initial Firebase and Facebook App Setup
Step 1. Create A Firebase Account and Obtain API Keys
Here's what they look like:

For now, just save them for later.
Step 2. Enable Facebook Login in The Firebase Console
- Go to Firebase Console
- Click your project (or create a new one)
- Click Authentication in the left sidebar
Here's where we're at:

Next:
Select Facebook as your sign in provider. You'll see a screen like this that prompts you for a Facebook App ID and Secret:

Which brings us to Step 3.
Step 3. Obtain Facebook App ID and Secret
- Visit developers.facebook.com
- Click My Apps in the top-right corner and then Add A New App.
- Go to your new app's dashboard to see your App ID and Secret
Here's where we're at:
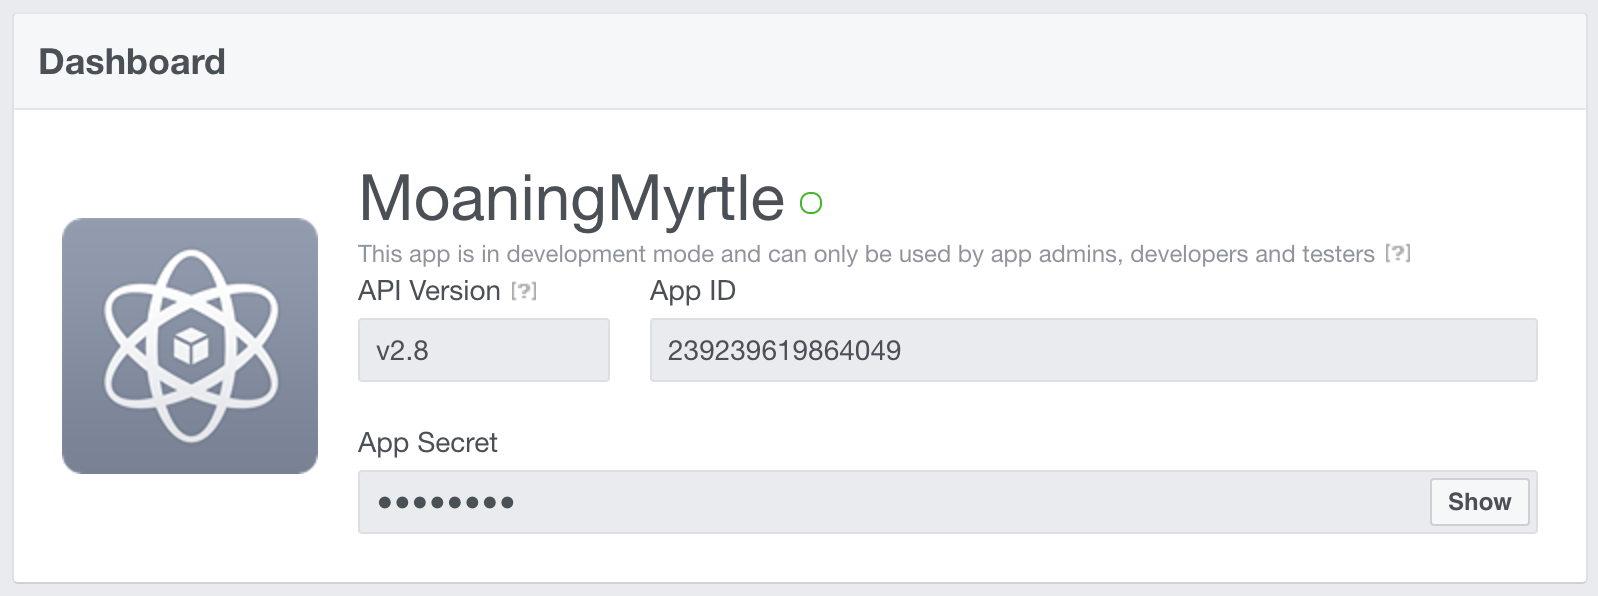
- Copy and paste the App ID and App Secret into the fields in your Firebase console.
- Next, copy the OAuth redirect URI and add it to your Facebook app configuration

Back at developers.facebook.com, click Facebook Login in the left sidebar (or click Add Products if you don't see it).
Paste the URI provided by Firebase as follows:

Damn, we're 50% done.
On to part II.
Part II: Integrating Firebase Facebook Login With A React App
Let's start with a clean, barebones react app.
npm install -g create-react-app
create-react-app my-app
cd my-app/
npm start
If everything looks good, kill the server.
Install Firebase and ReactFire:
npm install firebase --saveImport Firebase:
Make a new file in the src subdirectory (we'll call it client.js);
// src/client.js
import firebase from 'firebase'
Add your API key from Firebase and initialize Firebase:
// src/client.js
import firebase from 'firebase'
const config = {
  apiKey: "YOUR API KEY",
  authDomain: "YOUR AUTH DOMAIN",
  databaseURL: "YOUR DATABASE URL",
  storageBucket: "YOUR STORAGE BUCKET",
  messagingSenderId: "YOUR MESSAGING SENDER ID"
}
firebase.initializeApp(config)
export const ref = firebase.database().ref()
export const auth = firebase.auth
export const provider = new firebase.auth.FacebookAuthProvider()
Set an initial state:
Switch to src/App.js, which should have been generated by create-react-app;
You can delete the jsx in the render() function.
// App.js
import React from 'react'
import firebase from 'firebase'
// import provider and auth that we exported from src/client.js
import { provider, auth } from './client'
class App extends Component {
  this.state = {
    user: null
  }
  render() {
    return (
      <div className="App">
      </div>
    );
  }
}
Create a login and a logout function after we declare initial state:
// App.js
class App extends React.Component {
  login = () => {
    auth().signInWithPopup(provider)
      .then(({ user }) => {
        this.setState({ user })
      })
  }
  logout = () => {
    auth().signOut().then(() => {
      this.setState({user: null})
    })
  }

  // ...
}
Create login and logout buttons that call each of these functions inside render():
// App.js
...
render() {
  const { user } = this.state
  return(
    <div className='app'>
      <p>{user ? `Hi, ${user.displayName}!` : 'Hi!'}</p>
      <button onClick={this.login}>
        Login with Facebook
      </button>
      <button onClick={this.logout}>
        Logout
      </button>
    </div>
  )
};
Complete Example
import React from 'react'
import firebase from 'firebase'
const config = {
  apiKey: 'YOUR API KEY',
  authDomain: 'YOUR AUTH DOMAIN',
  databaseURL: 'YOUR DATABASE URL',
  storageBucket: 'YOUR STORAGE BUCKET',
  messagingSenderId: 'YOUR MESSAGING SENDER ID'
}
firebase.initializeApp(config)
const auth = firebase.auth
const provider = new firebase.auth.FacebookAuthProvider();
class App extends Component {
  state = {
    user: null
  }
  login = () => {
    auth().signInWithPopup(provider)
      .then(({ user }) => {
        this.setState({ user })
      })
  }
  logout = () => {
    auth().signOut().then(() => {
      this.setState({ user: null })
    })
  }
  render() {
    const { user } = this.state
    return (
      <div className='App'>
        <p>{user ? `Hi, ${user.displayName}!` : 'Hi!'}</p>
        <button onClick={this.login}>
          Login with Facebook
        </button>
        <button onClick={this.logout}>
          Logout
        </button>
      </div>
    );
  }
}
In its current state, all our app does is launch a login with Facebook modal. When our component mounts, it should check to see if some users are already authorized (so that they aren't prompted to login again).
To accomplish this, we'll use the React lifecycle hook componentDidMount().
// src/App.js
componentWillMount() {
  auth.onAuthStateChanged().then(user => {
    if (user) {
      this.setState({ user })
    }
  })
}